Simulation & Modeling

written by Unknown 11/30/2012 0 kind-hearted people


Hi guys!!


 In this entry, I want to exclusively talk about simulation and modeling. Have you heard about these two terms? Based on the definition made by Bliss et al. (1992), simulation is the exploration of existing models. Modeling is the expression of one's ideas by constructing one's own models.
DNA Model

          Simulation and modeling are both vital to enhance better understanding of students. It is due to the fact that not every students are not good enough in visualizing every processes that explained by the teachers. So, the best solution is creating a medium to transform that abstract process into something concrete. Sincerely speaking, if it had not been for simulation, me myself, who is teacher to be, failing to understand and explain the process while science subject do involve many processes. Luckily during my time simulation has been widely used. In addition, simulation also assists teachers to demonstrate dangerous experiments, and life processes that are too lengthy for example human fetal development. Students can gain their understanding and develop their knowledge.

Simulation of the graph

        Modeling, on the other hand, more to enable students exploring the effects on systems when they change certain variables. Thus, students will be actively learned when they try to find out something by discovering for themselves. Learning will be more meaningful. At the same time, this activity is actually developing the cognitive, psychomotor and affective skills of students.

         Based on the contributions of simulation and modeling, I personally think that teachers should look forward in utilizing this kind of technology for students' own good. Courseware that have been supplied to every school should not be wasted.

Here i want to share an examples simulation and modeling that very interesting to explore..(click the link below)


Here is my assignment on simulation and modeling (click link below )


Click here for STELLA Sofware tutorial 


Today i would like to share one of my assignment on data logging..

first of all, did you know what is data logging?


In general, data logging means of all data generated by a device such as a lab instrument, or the data passing through a particular point in a networked computer system. Data logging is a common measurement application. In its most basic form, data logging is the measuring and recording of physical or electrical parameters over a period of time. The data can be temperature, strain, displacement, flow, pressure, voltage, current, resistance, power, and many other parameters. 

How data logging works?

data logger works with sensors to convert physical phenomena and stimuli into electronic signals such as voltage or current. These electronic signals are then converted or digitized into binary data. The binary data is then easily analyzed by software and stored on a PC hard drive or on other storage media such as memory cards and CDs.


In my assignment, my group tried to investigate how our body reacts when we are exposes to the extreme condition such as cold and hot to maintain our normal body temperature.
Most organisms depend on maintaining a consistent body temperature, regardless of how hot or cold the environment surrounding them is. This process can be accomplished either by changing behavior to become cooler or warmer and keep temperature levels consistent, or through internal processes of the organism. Sometimes, both behavior and internal processes of a complex organism work in concert to maintain this temperature. The ability to maintain a consistent body temperature is called thermoregulation.

Click here to view my full report on Thermoregulation Using Data Logging


Rate of Photosynthesis

written by Unknown 11/27/2012 0 kind-hearted people


Today I want to share one my project when I’ am taking BIOLOGY 1 SBU3013 course. This is a group project, so our group has decide to investigate factor that affect the rate of photosynthesis.


I have compile all the scientific method in the form of video..

Let’s have a look… Enjoy!!


 Here is my slide presentation..


Hi everyone!!

Today I would like to share one of my project with my friend in PHYSICS ENERGY course.
Actually we are given a task to produce or to design a renewable energy to generate an electricity. Mabye some of you not understand with the renewable energy term.

Renewable energy is the energy can can reproduce back or is will maintain in the ecosystem. For example hydroelectric and solar. Hydroelectric use the flow of water to generate energy. As long there is water flow the energy can reproduce same as the solar energy that depends on sun. However, for the non-renewable energy the source of the energy cannot be reproduce back or it take a million years to reproduce. For example, petroleum and coal. 

let's back on track...

my group has come out with brilliant idea which is JUNKYARD ELECTRIC POWER PLANT USING HYDROELECTRIC CONCEPT

Here is the steps to built a junkyard electric power plant


TURBINE

 1. A measurement of the required size of the Perspex are drawn  on the big Perspex.


Picture 1: length of Perspex plate and octagonal shape of turbine


 Picture 2: width and rectangular shape of plate


2.    Octagon and rectangle shape are drawn on the Perspex by using marker.
3.       The mark then cut by using hack saw.

Picture 3: shape of Perspex required

4.     The hole required are marked on the Perspex, and then drilled by using drilling machine.


Picture 4: hole marked

5.      A steel bend is cut into required length and bended to form “L” shape.
Picture 5: L shaped

6.      All the Perspex are combined to form a turbine by using steel bend, screw and nut.

Picture 6: turbine


LED CIRCUIT

1.      The LEDs are fixed on the board circuit.
2.      The LEDs are connected to the motor by using of wires.


Picture 7: circuit


ELECTRIC GENERATOR

  1. A used motor is picked and tested for it coil.It coil must be working for the generator to work.
Picture  8 : show inside part of the coil used.

2.         The motor centre spinning rod is taken out.
3.        Another rod that can match the motor hole is taken and was welded with a steel plate at its centre      4.        Three pieces of used magnet is taken out from the broken speaker of a cars.
5.         The magnet is binded to the steel plate at the centre of the rod.


Picture 9: show magnet binded to the centre plate of the rod.


HYDROELECTRIC GENERATOR STRUCTURE

1.         A small bicycle is taken as the turbine medium to transfer its power to the electric generator.
2.         The bicycle front is cutted at centre of the bicycle body.
3.         Back part of the bicycle tire rim is connected with belt to the generator rim.
Picture 10 : show belt used to attached turbine cycle to the generator cycle rim.


4.         The base part of the structure is made of wood.
5.         The structure is like the picture shown above.


Picture 11 : show the structure of the hydroelectric power generator.

-          We have proceed with three trial and we calculated the average value for the voltage that we obtain from the multimeter.

-          We also went to the Sungai Samak, Tanjung Malim, Perak to test our hydroelectric because we want to know that our power plant can be generated  with the natural river   water. The velocity of the river was calculated.

Picture 19 : Our hydroelectric power plant installed at Sungai Samak, Tanjung Malim, Perak


Here is the video that demonstrate our JUNKYARD ELECTRIC POWER PLANT


Today I want to share of my project when I’ am participated in -à My Inovasi 2012ß-

Who knows what is MY INOVASI ?

This innovation competition is a program held by Ministry of Higher Education (MOE) to foster a culture of innovation and creativity for the benefit of the community.
My Inovasi competition is open to students of Higher Education Institutions (HEIs) of universities, university colleges, polytechnics and community colleges.

The objective of this program are :
·         To enable students to develop their creativity and innovation talent
·         To enable the community and industries to benefit from the competition
·         To foster team spirit among students from various background
·         To inculcate competitive spirit and sustainable innovation among students

On the first stage of the competition, we have to send two pages of A2 poster size that state our problem statement, and idea.

Here are my posters….

click an image for enlage


click an image for enlage

Unfortunately, my group didn’t manage to second round but it gave me a lot of info and new experience according to the innovation of technology in Malaysia.

I hope the government should continue this program in the future because it can generate of idea on young people which is good for our country in future…


Some of my friend asks me how to create a simple and easy video ?
---àMY ANSWER IS WINDOWS MOVIE MAKERß---

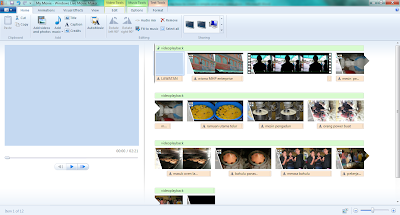
Windows Movie Maker is one of the freeware software when you are user of windows product. This software allow you to make a video in very easy way. I will show you tutorial getting started with WMM.

Step 1: Open Window live movie maker.

click to enlarge this image

Step 2: Import Pictures that you wish to insert into your video by clicking under the home tab on add videos and photos button.
click to enlarge this image

click to enlarge this image

Step 3: Import audio or song that you wish to insert into your video.

click to enlarge this image

Step 4: Edit video transition, there are several video transition available by clicking on the Animation tab
·         The fastest way to create a movie is you only has to hit the Auto movie button
·         Once you click it the Windows Movies Maker will automatically manage you video transition, title, credits and trim your background sound.


click to enlarge this image

Step 5: Add in the title for your video. You may also add in typing text into your video.


click to enlarge this image
Step 6: Save your video according what size of video u want..

Step 7: time to show off with your friends..XD


twitterfacebookgoogle plusmyupsirss feedemail

polls

followers